Thursday, 14 January 2016

Evaluation

        Over the course of this project, I have developed a greater understanding of the world of stop motion puppetry through researching theatre puppetry, a subject of which I only had a rudimentary knowledge beforehand. By applying the theories and ideas discussed throughout my essay to material tests, and in the fabrication of the inner structure of both a theatrical and stop motion puppet, I have been encouraged to strip the puppet back to basics and consider performance , rather than my usual focus on aesthetics. After all a puppet is intended to live, to capture the essence of animism, not to be a beautiful but dead object. This change of perspective has strengthened my core skills, enabling me to practice with new techniques, work on a new scale, much larger than any I have attempted before, and try out new materials

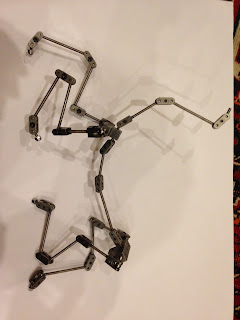
How the armature might appear once it has a head in place.
I would like the opportunity to give the puppet a head, which will give it focus,
important for creating the impression of life, and thought.
        Where my work might have been further developed is in testing how the puppets will move. While I am more comfortable crafting than performing, I could have handed over my puppets to willing puppeteers and animators for them to operate, allowing me to see how successful these structures are in creating the illusion of life, and to visually demonstrate how successful the application of knowledge and my understanding of the relationship between the two had been.

        Another area I would like to revisit on these puppets is the heads. Important not only in terms of being visually descriptive, the head is what gives the puppet a sense of focus. The direction of the head, and consequently the eyes allows the audience to interpret the thought process of an inanimate object, while the eyes provide a window to the soul and are arguable crucial for emotional investment from the audience. This sis a sentiment echoed by bot Barry Purves, and Jones and Kohler of Handspring.

        However, this is not the end. I intend to continue not only with these puppets, but in experimenting with the construction of puppets, and how the influence of theatre might be brought more to the fore of animation. Just because there are fewer examples of Brechtian influenced puppetry in animation does not mean that iaudiences would not be receptive to it. After all, animations such as Man O Man and Strange Hill High demonstrate how rod puppetry can be combined with stop motion in a comedic, self referential fashion, effectively revealing the puppeteer (or at least his operating mechanism) on screen, without completely shattering the audience's investment in the story, just as a theatre audience can accept the presence of a visible puppeteer, or the mechanics of the puppet. 


Constructing the Stop Motion Puppet

        In building the stop motion puppet, the influences of the theatrical puppet were to be found in the structure, so it is upon this area that I concentrated, rather than the surface design, as while stop motion does share theatre's artifice, it often relies upon a greater sense of verisimilitude, of disguising the inner structure and armature beneath. Theatre puppet's on the other hand are at greater liberty to leave everything on show. However, from watching animation tests of partly finished puppets, such as Corpse Bride it is possible to be caught up in the illusion of life, even without a finely decorated surface. 

        Initially, I was tempted to construct a miniature anatomically correct deer skeleton, joint for joint. However, by stepping back and concentrating and learning from the construction of the theatrical puppet, I have realised that this is just not necessary. While fluid movement is no doubt important, especially for an elegant regal animal like a red deer, I would not in all probability be animating each and every vertebra. The War Horses seem to manage very well without any movement in their back. While I wasn't quite sure enough to commit so entirely to the theatrical influence as to completely leave the armature on show, I did reduce the back to three joints, to create the distinct hump evidenced in my designs.

        Constructing the armature gave me a chance to put some of the knowledge shared by Animation Toolkit into action, beginning by carefully cleaning any greasy residue away in order to enable the Loctite to fix firmly, assisted by a generous 24 hour period for it to fully go off.


        Another way in which the stop motion was influenced by the theatrical was in the use of the bulkheads. Taking Animation Toolkit's advice on the use of car sponges for fleshing out the armature, I combined this with my plans for the theatrical stag, itself inspired by Handspring's hyena. Rather than attempt to sculpt the sponge freehand from a single block, or several blocks attached over the armature, I scaled up the plan I had drawn of the neck and body sections, using these as templates to cut out 'slices' of the puppet's body. Once each of these segments was cut, some were thinned at the top, to accommodate the curve of the body, particularly around the thicker, barrel chested front end, before being stuck together and fixed in place over the armature


        Over the quite delicate armature (which has some troublesome joints which loosen very easily) even the soft car sponge seemed quite dense and rigid. This is no trouble for the back, which as previously discussed will not need great levels of articulation, and may even be beneficial as it will provide support and structure, preventing the armature from moving in unwanted ways. However, in the areas with the looser joints, the sponge would fight the armature, and force it out of position while being animated. Consequently, I chose to shape the legs with a thin packaging foam, which can be layered up to create body around the threads of the armature, but not over the joints. Of course, appropriately sized bits of car sponge could be applied, leaving free the joints (which will need readjusting regularly), and then sculpted to shape.


        Having never worked with foam before I was pleased with the results. Employing the bulkhead templates has enabled me to accurately reproduce the shape of the theatre puppet on a small scale, and the puppet already more closely resembles a solid, living breathing animal, than when it was simply a bare armature. It would have been beneficial to hand over the armature to an animator, to enable then to experiment with the structure, and see whether the theatrically influenced armature is capable of producing a performance which convinces one of the illusion of life.


Wednesday, 13 January 2016

Assembling the Puppet

        Once all the pieces were cut, sanded and otherwise prepared, I was able to begin work on constructing the bulk of the puppet. The legs were straight forward enough to assemble, following the structure already tested with the hardboard prototype, and I encountered no problems. Before assembling the body, it was necessary to cut grooves in both the rib sections and the spine to enable them to slot together before fixing in place with adhesive.


        It was at this point that I began to notice structural issues. The spine, which had supported the rib sections well enough in the hardboard prototype, did not bear up under the increased scale, or indeed the more pliant nature of the plywood. It began to bow precariously, and with the added weight of the neck, not to mention the pressure of being handled repeatedly by numerous puppeteers, would surely lead to it snapping.

        Consequently the spine needed reinforcing, which I did by cutting making a template of the sections of the spine between each 'rib' and fixing them in place either side of the initial spine, with a strong glue built up in several layers.

        The neck too was tricky, as a careful balance was called for between flexibility and muscle structure. At first I considered string, but this was too soft, and would perhaps result in too much freedom. The next option was wire, but this would have made the neck considerably more rigid, requiring force to turn, and lacking the 'bounce' which would help indicate muscle. The solution was elastic, and small dowel vertebrae. This latter provided the necessary strength, a spine to anchor the bulkheads in place, while the elastic would allow the sections to turn but then bring them back in line, creating the follow through movement which occurs upon muscle movement and impact.


Sunday, 3 January 2016

Laser Cutting Issues

        Frustratingly, believing that I had fathomed the correct material setting to cut through the hardboard which I was using for the prototype, I encountered the same issue when I attempted to cut the remaining parts; only this time the laser had cut nearly the whole way through. As I had no material remaining at that point, I decided that it would be best to attempt to cut the rest of the way through with a scalpel. However, this was only possible on straight lines, the board being too sturdy for the scalpel to follow the smooth curves, and the resulting cuts were messy. I therefore had to wait until my next session on the laser cutter. While I understand the logic of the system of booking slots on the laser cutter, it was somewhat prohibitive to my work, it transpired that the final two slots I was able to book (one to redo the prototype, and one to cut the final plywood pieces) were too close together for me to fully assemble the prototype before the final cut. From what I could tell however, the bulkheads would work, the shape was good.


        I chose plywood for the final puppet (making sure to test the material setting in the laser first) because of its high strength to weight ratio. It would need to be strong, to bear not only its own weight, but the pressure of the puppeteers handling it, in a 'hands on' approach. However, the pliant nature of the material meant that it had a slight bow in it. As the pattern to be cut covered the full area of the sheet, there was no simple way of weighting it down, which meant that the focus of the laser was off in some areas and consequently did not cut. Thankfully, enough of an impression was made that all of the pieces could be snapped out of the sheet, and any remaining rough edged could be filed down.

        A welcome side effect of the laser was that the pieces had a nice, scorched effect around the edges, which was quite aesthetically pleasing. However, the layers of some pieces had begun to separate, perhaps as a result of the heat. Thankfully this was only minor, and could easily be glued back together. 


        In spite of a few teething issues, the laser cutter worked well in allowing me to create a functional structure, yet which also could past muster as an aesthetically pleasing object. Had the pieces been cut by hand they would no doubt have lacked the smooth precise curves achieved with the laser. I hope to use it again in the future, perhaps to assist with the construction of sets.