Sunday, 29 November 2015

Illustrator, Laser Cutting & Material Tests

        I had intended to use the laser cutter as part of one of the 2nd year modules, to quickly and accurately cut out a set of knives for mine and Fiona's abattoir based film. However, that plan was disrupted as the Illustrator file I had carefully prepared (the laser cutter requires a vector rather than pixel image) had unfortunately not worked properly. Due to a lack of time to rectify the problem, and high demand to use the laser cutters close to the end of the year, I abandoned the idea of using the laser cutter.

        However, the ability to (relatively) easily and efficiently cut out intricate shapes would be incredibly useful in allowing me to test out a number of different design solutions in the construction of my stag puppet. For example, whilst sketching silhouette poses of my character, I noticed that in some stances, the deer's hind leg very noticeably had four different sections: the hip/haunch, the thigh, the shin, and the toe/hoof. In some other positions the haunch and thigh blended smoothly together. After studying a number of puppets, it would seem that the majority do well without being 100% anatomically accurate: Muffin the Mule has only two sections in his legs, Joey the War Horse has three (the same structure as demonstrated in Handspring's earlier hyena puppet), and as a foal he has no joints in his legs. This last is appropriate for the stiff, shaky and precarious gait of a foal, but would not be suitable for the elegant, careful poise needed for a stag. Yet rather than rush into making a choice as to the structure of the leg, having use of the laser cutter allows me the opportunity to undertake prototyping tests, to see whether the extra joint makes a significant difference to the puppet's performance or whether Handspring's method is indeed the best.

        With the laser, there is also the potential to decorate the puppet. Aside from just cutting, the laser has a number of other options enabling patterns to be etched into materials. If I have time, this may be an interesting feature to explore.


        Rather than risk repeating the mistakes I made last year in preparing the digital file for cutting, I decided to ask for help. Using Adobe Illustrator it is possible to either draw a design or shape directly into the computer, or to trace over a scanned, hand drawn image. This latter is better suited to me, as I am not comfortable enough yet with using a graphics tablet, and have a steadier hand when working with pencil and paper. I would also prefer my puppet to maintain a distinctive hand crafted aesthetic, rather than the cleaner lines which may be achieved by entrusting the computer to 'join the dots'.


Design sketches, showing the intended shape and proportions of the
puppets, and how each will be constructed


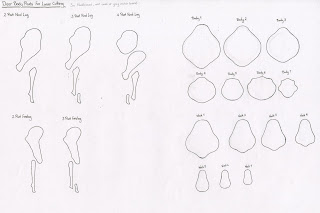
        Working from fairly rough sketches of what I envisaged my puppet looking like (I didn't want to have too detailed an image in mind, as it is likely that the final design of the puppets will be influenced by construction and material tests) I drafted the shapes, not only for the legs, but for cross sections of the body too. Once happy with the templates I then scanned them and traced them in Illustrator to create paths which will be recognised by the laser cutter. I duplicated each segment of the legs, as in the image of Handspring's hyena puppet it is possible to see that the legs are made of two halves, which gives them shape and form, rather than being simply 2 dimensional. If the puppets were to be viewed only in profile, like a shadow puppet, then the legs being 'flat' would not be an issue, but alongside a more shapely body and sculptural head, the contrast may seem odd.


        As the character this puppet depicts is very in tune with nature, I hope that the final puppet will be made from a wooden material (most probably plywood as not only is it strong and relatively light, but also has a natural looking grain). In an effort to keep costs down I decided to make the prototypes using a sturdy yet cheap 3mm grey hardboard. However, this in itself created issues as it was difficult to find the correct material setting which would cut through the board, rather than just scoring the surface. After a little trial and error, testing various settings, I found one which seemed to work (3mm hardboard) and was able to cut out the three prototype legs. These then had holes drilled at appropriate points for the joints, and were joined using screws and washers. It became apparent as I assembled these prototypes that it would be necessary to cut extra feet, which could be glued or otherwise attached to make a more solid foot, and some simple spacers, to hold the two halves securely together yet at the correct distance apart.

        Once the legs were assembled I came to the conclusion that all the aforementioned puppets demonstrated the best construction. The two part leg, with it's fixed foot position, gave an odd, high kicking pace, and lacked the necessary elegance for the gait of a stag, while the four part leg was over complicated. The extra section, the haunch, added nothing to the performance, and as I have learned through studying War Horse, too much movement can in fact distract the audience and overwhelm the gestures that truly matter.

        The next stage was to prototype the entire body.


        Another thing to consider is that with all of the components existing as digital assets in illustrator, it would be possible to take the leg sections, for example, and import them into After Effects, and arrange the pieces as though they were a digital puppet. to check that the articulation points work effectively, and test the animation.


Friday, 20 November 2015

Animation Toolkit - From Paper to Puppet at Manchester Animation Festival

        Animation Toolkit is a Salford based company which specialises in supplying stop motion animation kits, parts and materials, as well as manufacturing bespoke armatures and providing support and advice to animators of all abilities. Wes Wood, who was representing Animation Toolkit at MAF, is a experienced animator who has worked with Cosgrove Hall, Mackinnon & Saunders, and has worked on animations for CITV and Channel 5. 

        The presentation at MAF was deeply informative, providing a step by step guide to the process of designing and constructing a stop motion puppet, and a review of the various techniques and materials which might be used. As I have discovered, working with armatures is expensive (a 'professional' kit can cost up to £100, and a custom built armature in excess of £150), so any advice and insider knowledge which can help prevent costly mistakes is a great help. 

        Beginnng with a scale drawing of the character is a great help, as it helps to be able to lay the pieces of the armature over the character when fathoming out the construction. Sketching turnarounds can also be helpful for when sculpting your character. Most characters begin life as a clay, or plasticine maquette, a sculpt to show the character in its 3D form. These often dont survive, as they are used to create the moulds which will then be used to cast the puppet in foam, silicone or another material.

        The cheapest form of armature is a simple wire armature, which is quick and easy to make. Twisting two or more strands of wire together strengthens the armature and provides a back up if one strand snaps under the strain of manipulation (hands are particularly vulnerable). As wire comes in many gauges it is possible to use thicker, stronger wire for the legs, and also find much finer types suitable for fingers. However, a wire armature is unable to bear a great amount of weight, and the limbs may need reinforcing. This could be done using K & S telescopic tubing, which can provide a bone like casing over the wire, and prevent the wire bending at unwanted points. This tubing can also be used for removable hands, allowing replacements to easily slot in and out. Another feature of wire armatures is that they can be a bit springy, but this can be controlled by fleshing them out with a suitable material, such as foam.

        Essentially, stop motion is just a series of problems to overcome. A problem which I encountered when constructing my puppet last year was that the wire fingers were liable to protrude from whatever covering was used on them. A handy tip is to top each digit with a blob of resin glue, which should mask any sharp points, and prevent damage (especially to expensive silicone) as well as creating a fingertip.

        Silicone can be used for both moulds (although hard moulds made of resin and plaster are cheaper and easier to work with) and the puppets themselves. It is quite a temperamental material, being sensitive to temperature, so it is important to mix it correctly, paying attention to the manufacturers instructions. Also silicone can't be painted, as the only material that sticks to silicone is silicone, and even then only with the aid of a catalyst, but this can make the silicone brittle, something of a trade off. Silicone can be tinted, with an oil based paint, before being cast, but these colours may leech over time. There are companies which provide pigments especially for this purpose, but they only come in basic colours. If you require anything more exotic you must mix your own.

        Before casting your 'proper' puppet, it is helpful to do a slip cast, which will clean out the mould, allow you to get used to the material, and check there are no troublesome air bubbles. If casting in silicone, the visible seams in the cast can be trimmed using curved nail scissors (to minimise the risk of cutting into the puppet) and then sanded with 120 grit we and dry paper, with a solution of water and fairly liquid, or even white spirit. Foam latex is somewhat outdated as a puppet making material now, Jacobson's Chemicals now provide a fast foam which is better suited to the job. Using a release such as J Wax is a good release can prolong the life of a silicone mould, but can be detrimental to foam.

        Ball and socket armatures are more advanced than their wire counterparts. If working from a kit, all of the components should be cleaned with acetone to remove any greasy residue which might prevent the loctite from fixing the pieces firmly together. If using this method, the glue will need 12 to 24 hours to go off in a warm place. Last year I did not do this, and some of the ball joints came loose. Not a mistake I intend to make again. A better way of fixing the solid parts of an armature is through silver soldering, which creates s permanent, super strong join. Not all kits can be soldered, but Animation Toolkit's own products can be.


        To flesh out the body of the puppet, fast foam is a good option for any nude skin, as it has a smooth finish, and other puppets (such as the Corpse Bride) have a thin silicone skin. However, for clothed or otherwise covered (fur?) areas can be sculpted with a car sponge or any other form of sponge. A great many densities are available, so it is a matter of selecting one which provides the best balance between supporting, but not restricting or fighting the movement of the armature. With practice, it is possible to achieve great results by sculpting and sponge, and it is also a very cheap and readily available material. One which I shall consider for my stop motion stag.

       With all elements of building an armature, there are solutions and techniques to suit every budget. It is all a matter of cutting your cloth appropriately. As I am keen to work with a ball and socket armature, for the increased stability, and it superior articulation (which more closely resembles a jointed marionette), I will have to balance the cost by considering the use of cheaper materials elsewhere, such as a car sponge body. This would also eliminate the need to create moulds, reducing costs even further. This presentation will not only prove useful for my current project, but inform my creative practice for years to come.


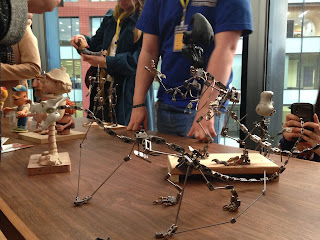
Some of the finer armatures which Animation Toolkit brought along.
The white dragon in particular was especially beautiful, with its delicate wing structure
and incredibly articulate tail.

Monday, 16 November 2015

Puppet Designs

        The first stage in designing my puppet was to work on some silhouettes of stags. This enabled me to study their movement, through strong and dynamic poses, and also concentrate on the shape of the animal. Strong silhouettes are important across all areas of animation, but perhaps even more so for a theatre puppet, as some of the audience will have to view it from afar, and its nature must be immediately apparent, even the materials from which it is constructed are not deer-like.

        The shapes which I was drawn to the most are those which are slightly exaggerated, with a large, barrel chest, shaggy neck, and more elegant hind quarters. This build is more masculine, indicating a stag, rather than just a deer. This is a shape which has been used before: Bambi's father, The Great Prince of the Forest, flaunted such a figure, yet still moved in a graceful and elegant figure. Another point about this shape is that, if built on a large scale, it will accommodate a puppeteer standing behind the shoulders, neck and head, operating in a hands-on style, without detracting from the subtle performance of these features.


        In spite of erring towards a more muscular figure, I still associate deer with beauty, with large, expressive eyes and velvety muzzle and ears. These were the features I wished to incorporate in the face of my stag, Rannoch (the name of the heroic stag in Firebringer). Although the hero of the story, and large, 'royal' beast, Rannoch is presented as being thoughtful and sensitive, so it would make sense if his face incorporated these features. While some of these designs came across more doe and fawn-like, I think I have found the appropriate balance, in the lower three designs.

        Having settled on both a head and body shape, it was time to consider the construction of the puppets, both theatrical and stop motion. Throughout the course of my research I have discovered that it is often the mechanism of the puppet that takes precedence over the surface design. As mentioned earlier, some of the audience will only see the puppet from afar and will not get to appreciate any surface details. What they will see, aside from the broad shape, is the movement, the performance. In all likelihood the design of my puppet will undergo some changes throughout the duration of the project, as I learn and discover new inspirations, or due to the results of material tests.

        So from these rough deigns, which focus on the strong silhouette and shape of the stag, I traced out the various components which would make up my theatrical puppet. Inspired by Handspring Puppet Company's Hyena from Faustus in Africa, as well as War Horse, I aimed to construct my puppet from a series of bulkheads, which would provide the form of the animal, but keep the wight down, as it will not be a solid object. as I envisage the puppet being quite large (two or three feet tall), weight is a key consideration, not only for the performers, but so that the puppet does not buckle under its own weight.


Saturday, 14 November 2015

Essay Structure

        Before launching headlong into the essay I thought it would be prudent to write an outline of what each chapter should include, showing how my arguments and thoughts might progress and lead logically on from one another. Having never written an essay with chapters before it seemed sensible to at least have a broad sense of direction, to prevent me getting lost.

Chapter 1: What is a puppet? Explore the definition and purpose of puppetry, and the concept of animism, which is essential to understanding puppetry. How stop motion and cinematic effects may fit within these parameters. This chapter may include a brief overview of puppetry’s origins and presence in history, to help contextualise its purpose. Discuss the ideas and principles behind WHY a puppet may be used (Barry Purves makes some good points on when and why stop motion is appropriate). The Uncanny? 

Chapter 2: The development of cinematic puppetry. The origins of stop motion animation as a special effect, and the development of animatronics and the parallels between the role of the animator and the performer puppeteer. A focus on the importance of performance as much as aesthetics. While performance is equally important for both traditional and contemporary forms of puppetry, the two mediums often have very different stylistic requirements: in the theatre it is possible for the manipulators and mechanism of the puppet to be on show (Brechtian theory) without necessarily shattering the illusion, but this is not possible, or at least not practiced in cinema. Puppetry is poetic and can be abstract, whereas cinema demands a degree of verisimilitude. 

Chapter 3: A case study 

Chapter 4: This chapter should be about the synthesis of my practical artefact, and how the ideas and knowledge explored in my essay have influenced the design and development of my own puppets. Explore why it was appropriate to create my chosen character as a puppet (both theatrical and stop motion). There will no doubt be obstacles in the construction that will have had to be overcome, and lessons that I will have learned. Discuss how the way in which the puppets will be performed has influenced their design, and perhaps how even the construction of one has influenced the other i.e. transferrable attributes from theatre to stop motion.

Tutorial 3

This was another enlightening and helpful tutorial, which helped me understand how the essay might take shape, and how my own practice is integral to shaping the question, as well as further practitioners it may be helpful to investigate.

Begin to segue into stop motion at the end of chapter 1
There should be a heavy emphasis on my practice to help define my questions.
Case study doesn’t have to be an entire chapter, can write about one of each 500 words. Compare and contrast? Plan B. Find out who in Handspring built the Warhorse puppets, try and speak to them directly. Talk to Mackinnon & Saunders – try and identify the guy who spoke to us last, who showed us the corpse bride mechanism. Better information than talking to the company heads.

Modern technology – used for both stop motion and puppetry. An idea for a case study?
Did anything come out of puppet masters?
Nenagh Watson – when does an object become alive? Dead puppets. 

Augmenting armature kits with other materials
Look for stop motion animation which reveals the mechanics of the armature
How might I bring Brechtian theory into stop motion, revealed mechanics. How might this impact the set design, rough concept…Barry Purves, set should mirror the materials of the puppet.
Bringing theatre aestherics to stop motion.
It’s not magic it’s all work.

Don’t spend too much time on the uncanny or animism. My emphasis is on craft and materials.

Also, although I had hoped to extend this investigation beyond stop motion, to encompass cinematic uses of puppetry, such as in Star Wars and Jurassic Park (animatronics), and into CGI, it is becoming apparent that this topic is so broad, with so many different facets, that I have given myself too much to work with, and it would be best to concentrate solely upon theatrical and stop motion forms of puppetry.


Monday, 9 November 2015

Deer Stalking at Lotherton Hall & Chatsworth House

        As discussed in Tutorial 2, it is important that I understand how deer move and behave, to help inform the design, construction and performance of my stag puppets. Fortunately, there are a number of deer parks not too far from home, which should offer a chance to observe these somewhat elusive animals.

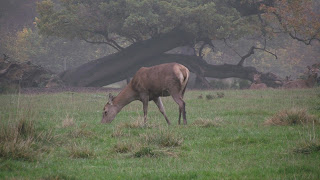
        The closest deer park is at Lotherton Hall, a stately home on the outskirts of Leeds with plenty of park land, and home to a small herd of Red Deer (fortunately the right species for my puppet). Unfortunately the day I chose to visit was rather grim and murky, making it hard to see some of the herd, which were grouped far from the fence. Happily there were a few who strayed closer to the fence, allowing for some closer shots. Oddly, the herd seemed to be entirely female, despite it being autumn and around the time of the rut (when the stags and hinds of the herd usually intermingle). Even after walking all around the park, I could not see any evidence of stags.

        While this was a slight disappointment, I could still study the behaviour and gait of the hinds, as anatomically there cannot be so much difference in the bone structure of male and female deer. My predominant observation was the extreme elegance of the animals, even when walking over uneven, muddy, potentially treacherous terrain, littered with fallen branches. They were extremely sure footed, walking with their heads held high rather than watching the placing of their feet. I also could not help but notice what alert creatures they were: at every beep and click of my camera, a number of hinds would raise or turn their heads to ensure there was no threat, and would continue to gaze intently for a considerable time. While their gaze was fixed upon me, I had a good chance to contemplate their facial expressions. As expected, it is the deer'e eye which draw the most attention, large and dark and enigmatic, fringed with long lashes (this is most certainly a feature which I would be interested in exaggerating in the design of my puppets). Yet as much expression is communicated through the ears, which makes me believe that I should enable my puppets' ears to be mobile.


Is that a pair of antlers hidden on the horizon?
        It was not until I viewed my photos at home that I noticed a suspiciously antler-like form hidden behind a grassy ridge. While it was no doubt frustrating to think that there might have been a stag there, I had walked the entire length of the trail and visited the viewing bunker without ever catching a glimpse of him. In short, I had done my best but to no avail, and watching the hinds was by no means a wasted experience. On the contrary, it was fascinating and deeply informative. 


        The next destination was Chatsworth House, a much larger estate within which the deer roam freely, meaning there was the possibility of getting closer to these majestic animals. However, there was the added challenge that they could be anywhere within acres and acres of open park land. Also, whereas Lotherton Hall exclusively kept Red deer, Chatsworth is home to Red, Fallow and Roe deer.


        After a bracing walk, I came across a small group of stags. However they were Fallow deer, which are smaller than Red deer, and with distinctive palm shaped antlers. Yet again, studying their behaviour was an invaluable experience, and their smaller size also made it less intimidating to get up close to these beautiful creatures, enabling me to not only take photos, but also a short video showing their walk cycle and a few mannerisms. This will come in handy as reference not only for any puppetry or animation tests I may do, but also in the instance that I recruit actors or puppeteers to manipulate my puppet for me. In the documentary charting the development and making of War Horse, there is a segment demonstrating the in depth workshops in which the puppeteers learned equine behaviour and characteristics, through observing the real creatures, in much the same way I am attempting to observe the deer.

Sunday, 8 November 2015

Meet the Puppetmasters at Waterside Arts Centre

        The Meet the Puppet Masters even was interesting as it spanned the breadth of the puppet making industry, from design, to maodel making, to the actual animation. The selection of speakerswas impressive and served to give a rounded view of the process of animating with puppets, as well as some fascinating insight behind some much loved animations, both old and new. There were a number of fascinating artifacts on display at the centre, from character designs to puppets from The Clangers, Bob the Builder, Corpse Bride and more, but unfortunately photography was not allowed.

        The first speaker was Curtis Jobling, an author and illustrator, as well as working in the animation industry. A similar story which seems to pop up with animators (and indeed illustrators) is that they loved drawing from a young age and Jobling was no different, his crayons ever present. He was inspired by the work and career of Ian Mackinnon, who went to the same school, an interesting connection. Animation is a small world, really. Jobling has no degree, and has not found this to be a hindrance in his career, as even if you have a degree you will have to begin from the ground up in the animation industry. He managed to get some work experience at Aardman, working on A Close Shave, and also on Mars Attacks! It is important to make the most of these opportunities and make an impression in whatever way possible. 

        However, these experiences made Jobling realise that his portfolio was not strong enough, so he took advantage of a year of unemployment to drastically improve his portfolio. It is about quality over quantity. Some of the commercial work that Jobling had been working on was an illustrated cat character which could appear on greetings cards. This cat later became a part of his design work for Bob the Builder, with a few minor changes to the colour scheme and the shape of the cat's head. Bob also initially had a moustache, to make the lip synch animation easier, but apparently children can be frightened of facial hair, and so Bob was given a shave. Other design features which were influenced by the fact that Bob would be a physical puppet were bigger feet to allow him to stand, and bigger hands so that he could hold the tools. It is important that there is dialogue between all areas of puppet making, so that the designer, who may not be involved in the construction and animation, understands what is required of the puppet.

        For a character designer, consistency is key. The difference is, Jobling suggested the difference between a Pixar film and a Shrek film. In the former, there is cohesion across the characters, they look like they belong together, and are part of the same world, whereas in Shrek there is too much variation between some characters, and it looks as though they have been designed by separate people with their own distinct visions. This cohesion will be important to bear in mind when designing my puppets, particularly the theatrical one, as alongside human actors a puppet's artifice can become all too obvious, and it could stand out for all the wrong reasons. Aside from strong design, and solid construction and performance, a way to make the puppet belong is to use the same materials and colour schemes across the scenography, to make the puppet seem at home, at one with its surroundings.

        The second speaker was Carlos Grangel, a character designer who has worked across a range of animations in his twenty year career. Grangel's work itself is beautiful, but so very versatile, able to adapt between the macabre stylings of Tim Burton and the softer, more humerous designs needed for film such as Madagascar and Hotel Transylvania. Grangel's animation career began in London, at Steven Spielberg's company Amblin Entertainment (Grangel asserts the the UK and America have some of the best designers in a very competitive industry). Initially intended as 5 days training, it turned into a five year position. In spite of the technical avances that have occurred during Grangel's career, he still prefers to work with a stick of charcoal than on a computer, something which I can relate to. There is an extra character and quality which comes through the energetic lines of Grangel's illustrations, which one imagines would be near impossible to replicate digitally. 

        However, Grangel's illustrative style was at first a hindrance, as he was apt to include too much depth detail and complexity to be replicated in characters redrawn frame by frame. This is not so much of an issue with stop motion characters, as the detail, once sculpted or stitched on, is there for good. However, it was necessary for Grangel to change his way of thinking, and consider his drawings as characters for animation. He also struggled to visualise his character designs from all angles and create turntables. However these are important for giving the animator as much as possible to work with, to let them get to know the character and their movement and expressions.

        The first step in designing a character is to draw silhouettes. A strong silhouette is the foundation of a strong, easily recognisable character, and it can also be helpful to draw the entire cast as silhouettes alongside each other to ensure that they have the same aesthetic and that they work together to form a cohesive world. Once you have a strong silhouette you can work from there, but be careful not to loose the line and proportions.


        After the closure of Amblin's London studio, Spielberg opened Dreamworks with Geoffrey Katzenberg, by whom Grangel was also employed. He was reluctant to move to America (he prefers to work at home than 'in house'), and suffered insecurities about his own abilities, but was persuaded to make the move to work on The Prince of Egypt. This film called for a more realistic style than he was used to, and he had to match the skill of the other designers. After that he also worked on Antz (which he didn't enjoy) and The Road to El Dorado (which he did) for Dreamworks.

        His work with Mackinnon and Saunders on The Periwig Maker lead to him working with Tim Burton on Corpse Bride which he claims to be one of his best experiences in the industry. Burton could probably have designed the characters himself, but he was a little too lazy, whic allowed Grangle to really stretch his muscles designing a range of weird and wonderful characters, many of which were translated into beautiful puppets by Mackinnon and Saunders. For these designs, Grangel found it helpful to work on the back of cereal box card, which are apparently an excellent material on which to draw and paint, and the grey patina was well suited to the style of Burton's film. It was on this project that he first felt as though his opinion was valid...the first time he was asked which of the characters he preferred. He was unused to such freedom, and working with directors who were so open to crazy and scary designs. However, many of the characters had extreme proportion, which were a nightmare for Mackinnon and Saunders to translate into 3D puppets. It drove them crazy but they managed to succeed in accurately recreating many of Grangel's designs, many of which are so close they look as though they could have stepped off the page. The artistic styles were well matched in this project. Grangel also worked on the props for this film, helping to maximise the design consistency.


        Grangel's next project was again with Dreamworks, on their collaboration with Aardman, Flushed Away. While this film mimicked the much beloved Aardman aesthetic, something was lost in the translation from plasticine to CGI. It lost all of it charm, along with the fingerprints. This is not to say he didn't enjoy working on the film, but he was disappointed in the end result. He was happier with the result of Aardman's Pirates!, on which he also worked. Rather than adapting his style to the Aardman aesthetic, he develpoed the characters in his own, more detailed style before simplifying them a little and making them more Aardmanesque. Having seen Grangel's designs, and the finished film, it is clear to see how many of his ideas and designs were incorporated.

        Some of Grangel's more recent work was for Hotel Transylvania. Throughout his talk, Grangel highlighted the importance of reference, whether for historical accuracy or to assist in making a caraicature of Queen Victoria. For this project, Grangel referenced old school horror actors, attempting to create caricatures one would instantly associate with the genre, but at the same time incorporated some of Adam Sandler's own features into the character of Dracula. He wanted to duistance the characters from their most iconic incarnations.


        Some of the final points which Grangel made:
  • He doesn't work on sequels, as life is too short to tell the same story twice, and you aren't challenging yourself if you aren't finding a new style.
  • Horses are incredibly difficult to design. They are perfect creatures, and so easy to get wrong, and these faults will stand out, and people will notice.
        The final talk of the day was given by Peter Saunders


Friday, 6 November 2015

Tutorial 2

        In preparation for the second tutorial, I wrote a short piece which would clarify in greater depth my intentions for the practical aspect of this project. While this would provide a discussion point within my tutorial, I also felt it would be beneficial to me, as this was in my opinion the weakest part of my proposal. However, after the first tutorial my ideas have begun to fall into place and I feel that I now have a more developed concept of what I will need to achieve. This is still a considerable to task to undertake, and while it will no doubt be demanding, I am excited about what I might achieve.

            In constructing a number of puppets, I hope to incorporate the principles which my reading and research has so far uncovered. A common view shared by practitioners and theorists alike is that a theatrical puppet should not be burdened by the weight of realism, at least not in appearance. As eloquently put by Barry Smith “a puppet is a puppet – not an imitation actor…the less the puppet depends on naturalism, the greater is its power of illusion; but the more the puppet tries to imitate the surface of life for its own sake, the more it draws attention to its limitations.” This principal is well illustrated by Handspring’s puppets; constructed from bare cane, plywood, paper and fabric, they are beautiful objects in their own right, but would never be mistaken for real animals. Their illusion of life is rather drawn from the way in which they move and breathe. To this end, I will attempt to focus my investigation as much on the mechanical construction and movement as on the surface design of the character.
                The stop-motion puppet is different. Unlike its theatrical counterpart who will usually be viewed from afar, it will be subject to the close scrutiny of the camera. While this does not mean that a greater level of realism/naturalism is called for in the design, it may require a greater level of detail. A stop motion puppet may have need of a more expressive face.
        While my practical investigation will initially be informed by my research, I anticipate that a great deal of learning and development will happen throughout the construction of my puppets, and that my portfolio will consist of various prototypes, material tests and maquettes, as well as more finalised pieces.


          How can I incorporate the various elements together? At the moment it feels a little disjointed between creating a theatrical and a stop motion puppet. I understand that the best way to incorporate CGI may be as rigging tests for the construction of the puppets, rather than a fully modelled character.

        Another issue which had previously been raised by my tutor was my tendency for perfectionism which may impact on my ability to complete the work on time. This is something which had been of concern to me, as while I am aware that the construction and mechanism of the puppets is integral to my project, I have a strong desire to make a fine and beautiful artifact which I would be proud to have in my portfolio. Consequently, the prospect of making a skeleton or armature with a rough or unfinished quality to it did not fill me with excitement.

        Fortunately, while studying the work of Handspring Puppet Company, I came across their puppet of a hyena. Like their War Horses, the hyena was minimal; not finely carved or sculpted like a traditional marionette or immensely detailed like a shadow puppet, but still a beautiful artifact in its own right.


        The mechanics and structure of the hyena are effectively still on show, hidden only beneath a tattered layer of gauzy fabric, which connects with the Brechtian ideology (as do the visible controllers) of highlighting the artifice of the performance. Yet in the hands of skilled puppeteers, the puppet is capable of a realistic and natural performance which creates an illusion capable of transcending its artificial appearance.  

        It is on puppets like this that I hope to base my designs. They can still be attractive, expressive and full or character, but need not necessarily be highly polished and made from the finest material...the structure of the hyena is made of plywood, and uses canoe construction techniques, while Joey the War Horse is made from a skeletal structure of canes covered with a nylon gauze. Where the design is most successful and considered is in their faces, as much of the vivacity of a puppet can be attributed to its gaze. We have to believe that they are seeing and thinking if we are to believe they are living and not just moving.


        Other topics which were brought up and discussed during this tutorial include:

  • Whether or not the puppeteer for my puppet should be hidden. This is a consideration which may affect the design, shape and size of my puppet. For example, the shape of the stag may be exaggerated (tall at the head with a sloping back) to accommodate a performer controlling the head.
  • Following on from this, by the next tutorial I should really have decided on the scale of my puppet. While ideally I would love to work at full scale and produce a life sized stag, this is not entirely practical. If the puppet does not need to interact with humans (as is the case and justification for War Horse's life sized animals) then it is not necessary for it to be so large.
  • When designing the corresponding stop motion puppet, consider the possibility of carrying through the visible mechanics and structure which is likely to be a feature of the 'traditional' puppet. Could the armature be visible in points, or incorporated into the design?
  • Although I am very much a designer maker rather than a performer, performance is an integral and recurring theme in this project, I should seriously consider filming/animating the movement and performance capabilities of my puppets once they are ready. This could just be a short scene or vignette to prove that they work.
  • I need to gather reference, not just for the appearance of stag, but also for their movement and behaviour. A deer park would be a good place to start (there is one at Lotherton Hall and one at Fountains Abbey, neither of which are far and both of which have red deer), and as now is about the right time for the rut, there is the chance to gather some really dynamic reference material. I could also persuade actors or performers to learn the behaviour of the deer and film their performance, and perhaps even convince them to operate the puppet at a later date, as my previous experience is that I will simply not be comfortable performing (unless performing with a puppet is somehow liberating, as the focus would not be on me, but the puppet, if I do my job right).
  • While my instinct is to keep the designs quite real and natural, I should also experiment, at least in the early design stages, with more surreal, fantastical shapes and styles. I should work more freely and produce, loose, quick silhouettes which push the extremes. Step outside my comfort zone!

Monday, 2 November 2015

Red Rust

        I recently attended a performance by Odd Doll Puppetry Theatre. The show, Red Rust, featured a variety of different puppetry techniques from a highly articulated rod marionette, to an army or Punch-esque glove puppets, and a herd of cuddly, pillow like hand puppet cows. The company consisted of three performer puppeteers and a harpist who provided live musical accompaniment.

        The narrative itself demonstrates puppetry's aptitude for dealing with what may be termed difficult subject matter. While Odd Doll's previous show, The Worried Walrus, was family entertainment, Red Rust is more suitable for adults, and contains some very dark and sinister themes. Although never made explicit, the story is that of a woman beginning life in perhaps a care home or an institution. She is alternately tormented and comforted by her memories, while the shadow of death (an oddly sinister balloon) looms ever closer. There is little dialogue, and none from the central character herself. Instead, the audience is allowed to interpret the finer details of the story themselves, enabling them to project some of their own personal experiences and feelings onto these puppets, making the show an emotional experience.

        It is through the series of memories that the different puppetry techniques come into play. The first to be introduced are the aforementioned cows, illuminated by warm yellow lighting which evokes a pastoral and idyllic image of the farm that we come to understand is the character's past, and the location of her happier memories. This is in stark contrast to the 'present', her life in the home/hospital, where the identikit glove puppets represent a swarm of nurses and carers who twitter about ineffectually, locking their patient's memories away behind trapdoors.

        As is to be expected from glove puppets, their animation is somewhat haphazard and skittish, but this fits with their careless and brash personality (indeed they seem to be one and the same). The animation of the marionette, on the other hand, is subtle and hypnotic. At first, the prospect of having two and even three people operate a puppet no more than two feet tall left me somewhat dubious: would they not be a distraction? Wouldn't they obstruct the view of the puppet? However, once the puppet began to move, the puppeteers quickly faded into the background, and it was not difficult to focus attention on each expressive movement of the marionette. For the most part, she was confined within a small perimeter, but would occasionally struggle to break free, and it was here that the animation was especially good. In the small, intimate theatre it was almost possible to sense the audience hold their breath as the puppet's legs trembled under her attempts to stand and walk, everyone focused on the tiniest of movements. Similarly as she attempted to hold back the oppressive balloon, the marionette was imbued with a sense of weight and strength, as though she really was struggling under great pressure.

        It was not just traditional puppets that Odd Doll relied upon. There was a strong use of lighting to emphasise the mood and storytelling, through changing colours and the raising or lowering of a spotlight creating a soft or harsher atmosphere. The company also made use of a miniature house, which was opened up and then filmed, with the images projected on a screen. The projected images sometimes acted as a gateway into another memory. One such scene which stood out was ostensibly simple: a couple preparing tea together. However, through considerate lighting and sensitive acting this sequence became beautiful and romantic. Although the two performers involved were entirely on show, focus was drawn to just their hands, which effectively became the puppets. The way they interacted, caressed and elegantly handled the the tea service (the tea, milk and sugar were all replaced by a stream of cerise glitter, matching the romantic lighting) was akin to watching a dance. At another point three identical Corn Flakes boxes became three very distinct characters, who, like a humanette, had the puppeteers' hands as their own. 

        It is a credit to the ability of Odd Doll's performers that whether they are acting through a puppet, a cardboard box or as themselves they are equally engaging and arresting, able to hold the audience's attention and make them invest in the stories of inanimate objects. There were aspects which left me a little confused: for example, there were numerous incarnations of the central rod marionette, some whole, some with broken faces, and some with a hole ripped through the abdomen. While it is reasonable to assume that the latter may represent an abortion or miscarriage, I was unable to understand the meaning of the shattered face. Yet for the most part, Red Rust was a powerful, affecting, thought provoking and beautifully performed piece of puppet theatre which has shown me how diverse contemporary puppetry can be.